Mailchimp integration — automate wishlist campaigns
Overview
The Mailchimp integration sends wishlist activity from your store to Mailchimp so you can automate follow-up emails based on what shoppers do. After you connect Mailchimp, you can build customer journeys for events like back in stock, price drop, wishlist reminders, and wishlist abandonment using your existing Mailchimp audience, templates, and segmentation tools.
Mailchimp automation for wishlist events is available on the Enterprise plan.
When Mailchimp is connected, the app’s built-in Back in Stock and Price Drop emails are automatically turned off to prevent duplicate notifications. Mailchimp becomes the delivery channel for those message types.
Why use the Mailchimp integration
This integration is best for stores that want more control over timing, branding, segmentation, and automation. Instead of sending one-off notifications only, you can use wishlist behavior to build full email journeys inside Mailchimp.
Trigger automated journeys from real wishlist activity
Segment customers based on shopping intent
Send branded emails with your Mailchimp templates
Recover missed purchases with reminder and abandonment campaigns
Combine wishlist events with other Mailchimp customer data for more targeted marketing
For the best results, keep your Mailchimp audience clean and your customer tags organized before you build automations. This makes it easier to create high-intent segments like shoppers waiting for a restock or customers who saved discounted items.
Supported wishlist triggers
You can use the following events in Mailchimp automations.
Price Drop on Wishlist Item — Send an email when a saved product goes on sale.
Wishlist Item Back in Stock — Notify customers when a saved out-of-stock product becomes available again.
Wishlist Item Low in Stock — Create urgency when inventory is running low.
Wishlist Reminder — Remind customers about products they saved but have not purchased.
Abandonment Wishlist — Re-engage shoppers who added items to a wishlist but became inactive.
Item Added to Wishlist — Start a follow-up campaign when a shopper saves a product.
Item Removed from Wishlist — Re-engage shoppers who removed a product or offer alternatives.
Before you start
Make sure you have the following ready:
An active Mailchimp account
The correct Mailchimp audience selected for your store
Your Mailchimp Audience ID
Your Mailchimp API key
Enterprise plan access for the Mailchimp automation integration
Set up the Mailchimp integration
In Shopify, go to Apps → WC Wishlist & Back in Stock → Settings → Integrations → Mailchimp.
Turn on the Mailchimp connection in the integration settings.
In Mailchimp, open Audience, then go to your audience settings and copy the Audience ID. Paste it into the matching field in the app.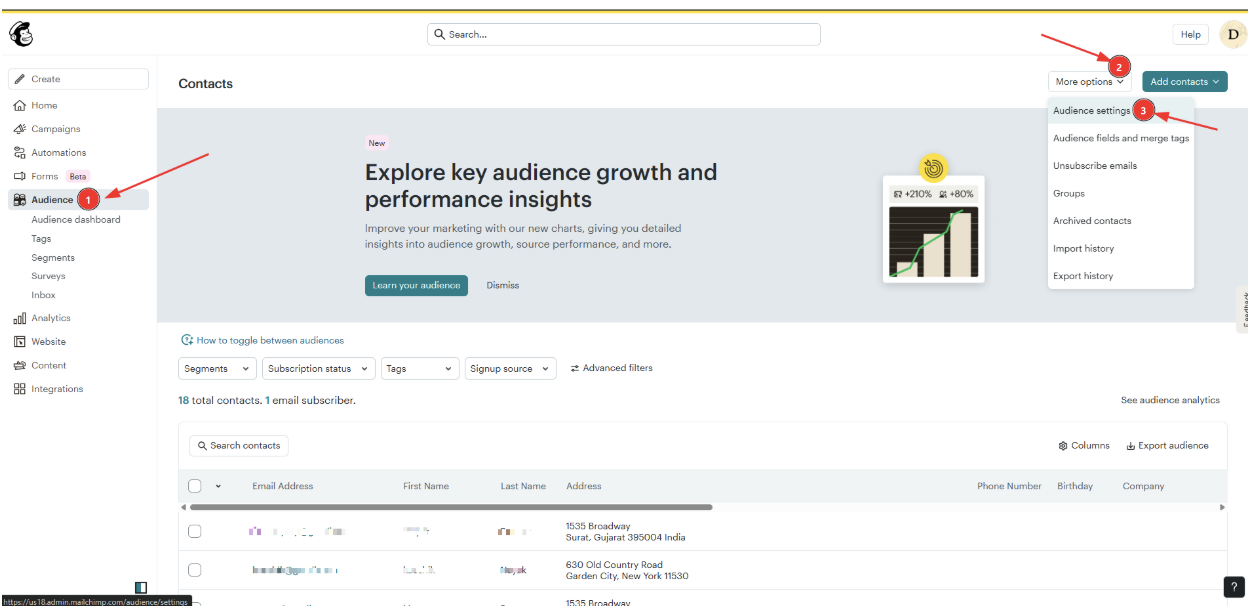
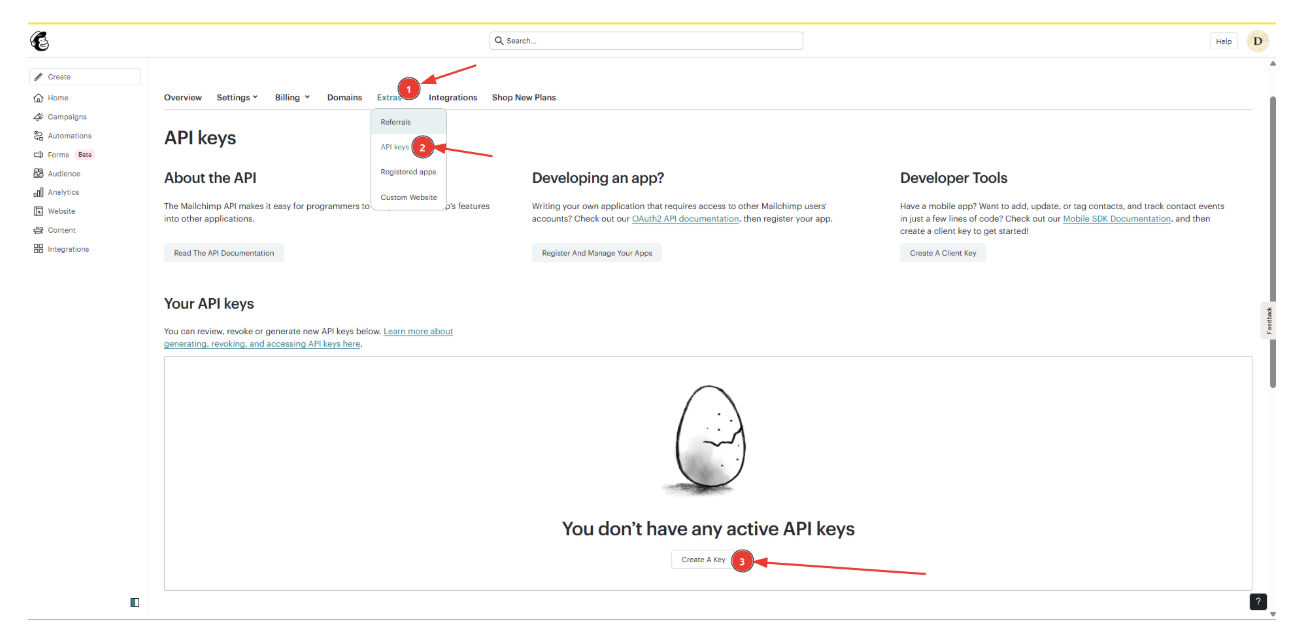
In Mailchimp, go to Profile → Extras → API keys. Create a new key if needed, then copy the key and paste it into the app’s API key field.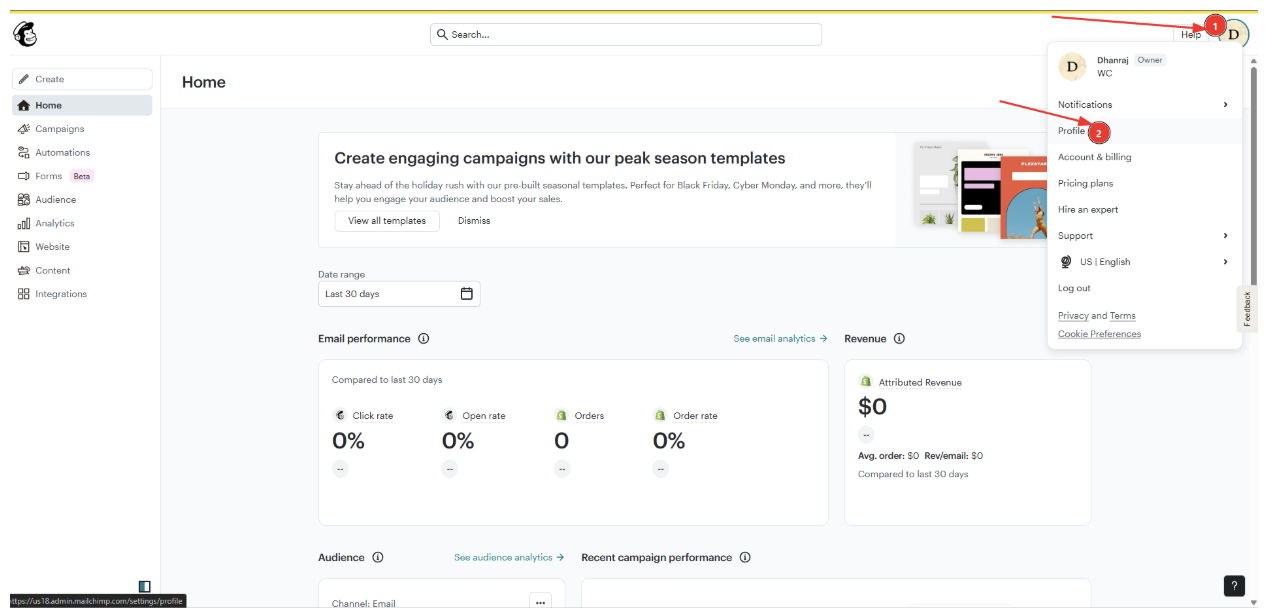

Save your settings in the app. Once the connection is successful, wishlist events can start syncing to Mailchimp.
In Mailchimp, create a customer journey or automation that uses the synced wishlist event you want to act on. Choose the event, set your timing rules, and select the email content you want to send.
Setting Up the Integration
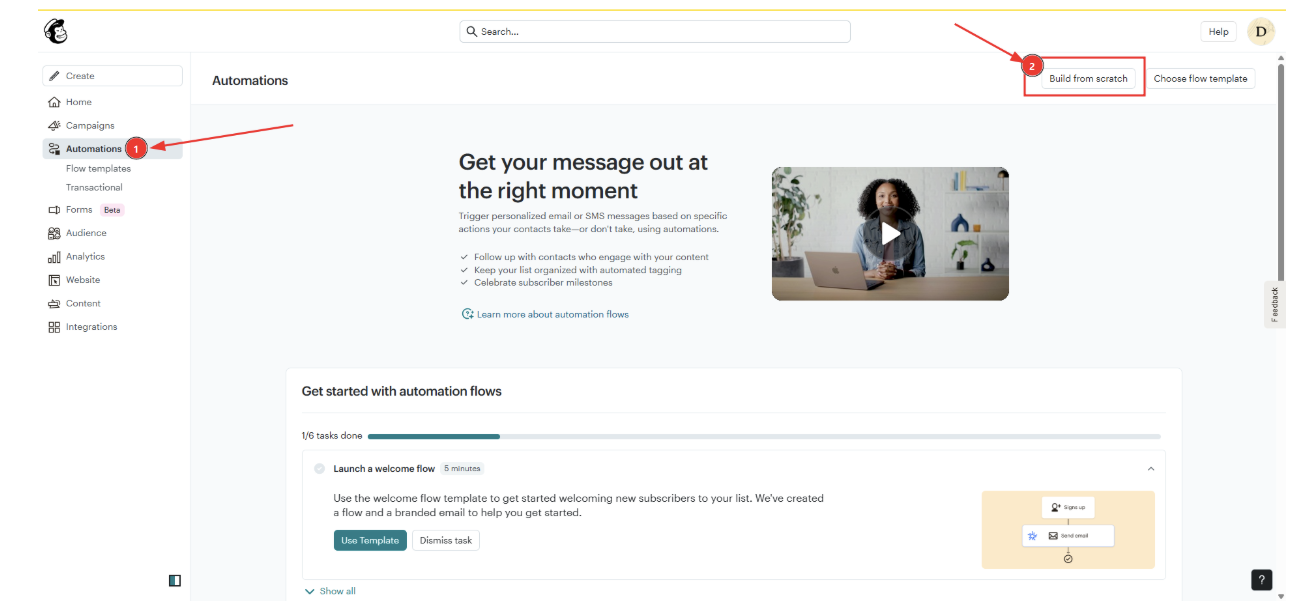
Go to Automations → Build from Scratch.
Enter a name for the integration and click Choose a Trigger.
A popup window will appear.
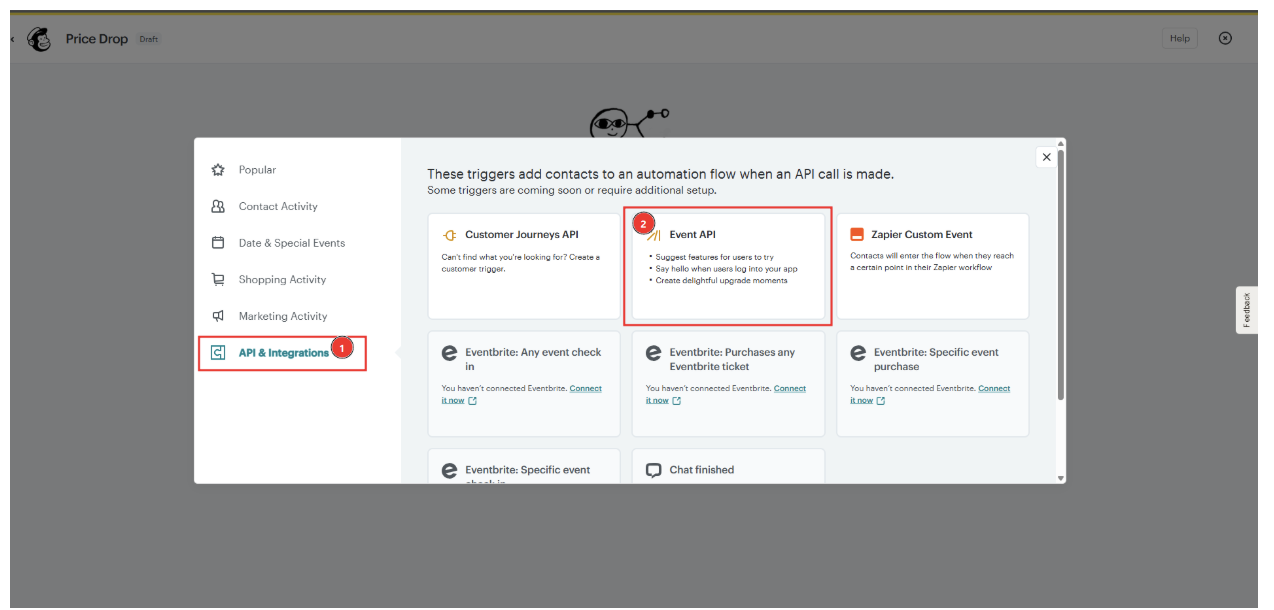
From the left-side menu, select API & Integrations.
Choose Event API.
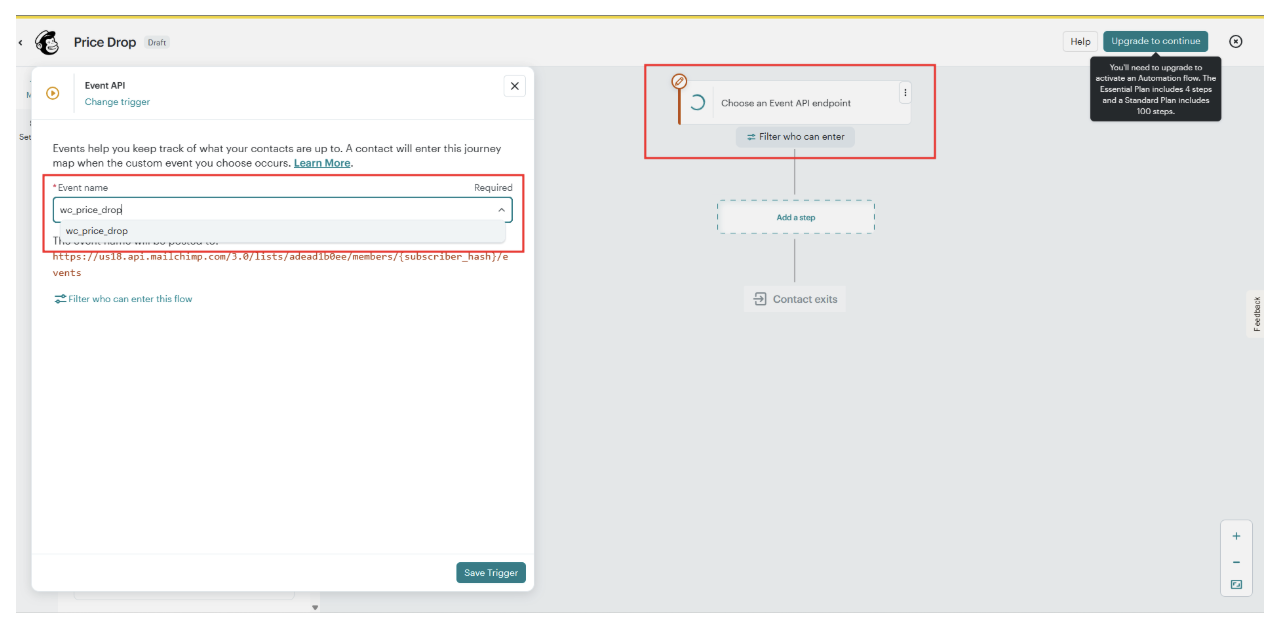
Select Wishlist Club Events
From the list of available events, select the Wishlist Club event you want to capture.
Choose the action you want Mailchimp to perform when the event is triggered.
Save the automation.
Triggering Events
Once the integration is configured, the selected events will automatically trigger whenever the corresponding activity occurs in the WC Wishlist Club app.
Checking WC Wishlist Club Events in Mailchimp
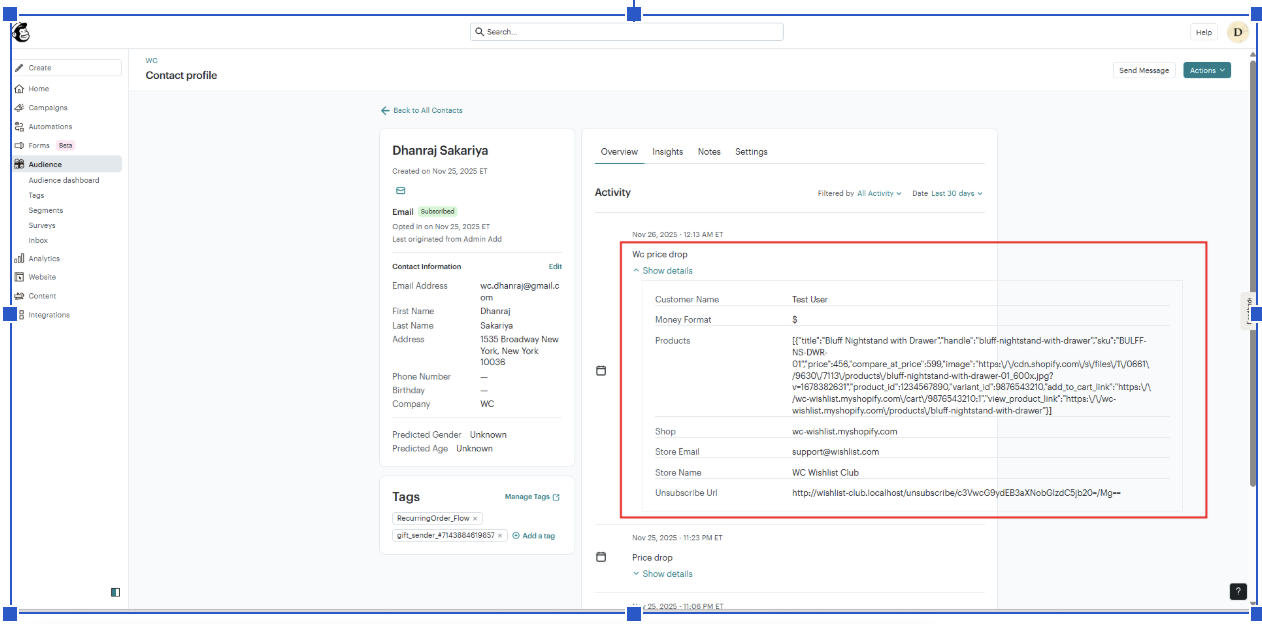
Go to Audience in Mailchimp.
Search for and open the customer profile you want to review.
In the customer activity timeline, you’ll see the events received from WC Wishlist Club.If the API key is invalid, expired, or copied with extra spaces, events may not sync correctly. If syncing does not start after saving, generate a fresh key in Omnisend and paste it again.
Best practices
If you want to make this setup work at its best, use these recommendations:
Start with one high-intent flow first. Back in stock and price drop automations usually perform well because they match clear customer interest.
Use short delays for urgent events. For back in stock or low stock campaigns, send quickly while shopper intent is still high.
Add product details to your email content. Include the saved item name, image, price, and direct link to the product page whenever possible.
Segment by behavior. Create different journeys for customers who save often, remove items, or respond to discounts.
Limit overlap between journeys. Make sure the same customer is not entering too many similar automations at once.
Test with your own email first. Before going live, trigger each event with a test customer to confirm timing, content, and links.
Keep branding consistent. Use the same visual style and tone across your Mailchimp templates so reminder emails feel like part of your storefront experience.
The strongest setup for most stores is: Back in Stock for urgency, Price Drop for deal-seekers, and Wishlist Reminder for customers who need an extra nudge.
What happens after you connect Mailchimp
Once the integration is active:
Wishlist events are sent to Mailchimp
You can use those events in Mailchimp automations and journeys
Mailchimp handles delivery for supported event emails
The app stops sending its built-in Back in Stock and Price Drop emails to avoid duplicates
The integration does not automatically create Mailchimp campaigns for you. You still need to build and activate the automation inside Mailchimp.
Troubleshooting
Check that your Audience ID and API key were copied correctly with no extra spaces. Also confirm that the API key is still active in Mailchimp.
Make sure the integration is enabled, the Mailchimp automation is published, and the journey trigger matches a supported wishlist event. If the event is syncing but the automation is still inactive, review the journey settings in Mailchimp.
This is expected after connecting Mailchimp. Those built-in emails are disabled automatically so customers do not receive duplicate notifications from both systems.
Confirm that the action you tested is one of the supported triggers and that the customer activity happened after the integration was enabled. Then verify you are checking the correct Mailchimp audience and automation.
Recommended campaign ideas
Back in Stock recovery — Notify customers as soon as a saved product is available again.
Price Drop conversion — Send a sale alert when a wishlisted item is discounted.
Wishlist reminder series — Follow up after a few days with product benefits, reviews, or low-stock urgency.
Wishlist abandonment recovery — Re-engage shoppers who showed intent but did not return.
Low-stock urgency flow — Encourage faster purchase decisions before saved items sell out.
Need help?
If you are not sure which file to edit, or you would rather have us handle the installation, contact our support team:
Email: [email protected]
Live chat: available from the app admin
Free onboarding 1:1 call